How to Sharpen a Serrated Bread Knife with Ease
Method 1: Using a ceramic sharpening rod
1. Select your Sharpening Rod
As we have already mentioned, to manually sharpen a serrated knife you will need a specific tool that can get inside those grooves.
Ceramic (and diamond) rods are one of the most popular methods of manually sharpening a bread knife. The rod shape is designed specifically to get inside the serrations of the blade. This allows you to sharpen your knife tooth by tooth
Messermeister Ceramic Rod Knife Sharpener, 12-Inch
The Messermeister takes our top recommendation spot because it really is a strong, high performing ceramic sharpener. The rod is built from industrial strength ceramic combined with an alignment steel that will sharpen your dull serrated edges in just a few strokes.
Step 1 – Find the Bevel Edge
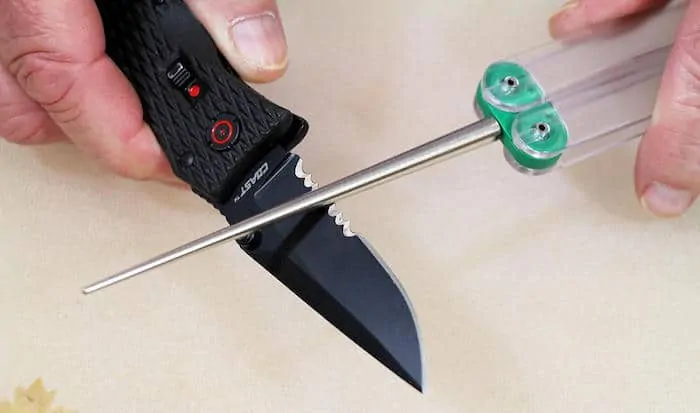
Most serrated knives, whether it is a bread knife or a sports knife as seen in the image above, will have a one sided bevel edge.
The bevel-edged face of the blade will angle slightly on the inside of each serration. (Using the image as an example, the bevel edge is the top side up). You should only ever apply the sharpening tool to the beveled edge of your serrated knife.
Step 2 – Using the Sharpening Rod
You now need to place the sharpening rod into one of the serrated grooves. (This is also known as the “gullet”),
The rod needs to be kept a very shallow angle (see more about angles at the bottom of the article) in line with the beveled edge. If you are using a tapered sharpening rod, you will be able to align the rod at a position where it is the same diameter as the gullet, therefore filling the groove completely.
Step 3 – Sharpening the Gullet
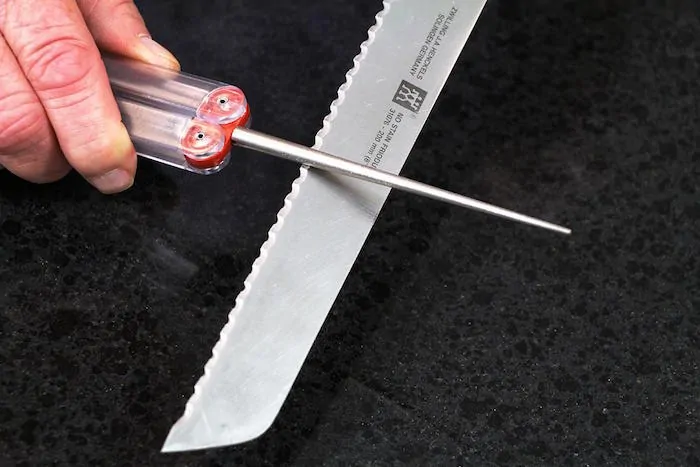
First ensue you are will be using the sharpening rod through the bevel edge of the blade.
Then using smooth, short strokes, run the rod through each groove of the knife. You should always stroke away from the blade so as not to potentially harm yourself. Each groove should only require a few passes of the rod.
Once you have sharpened a groove, you should check the other side of the knife for any metal shavings, (or what is otherwise known as a ‘burr’). The best way to check this is to run your finger alongside the blade.
Continue to sharpen each groove on the blade, ensuring to adjust the rod to fill the diameter of any varying gullets.
Step 4 – File away the burrs

You can easily remove the burr after sharpening by moving the knife carefully over the edge of sharpening stone.
Alternatively you can rub the back of your knife against a sheet of fine-grit sandpaper.
Step 5 – The Straight edged Section of Blade
Some knives are partially serrated, meaning that a section of the knife will have a straight edge to it.
To take care of this area of the knife you will need to use a whetstone or other sharpening tool. Never use a serrated knife sharpening rod on the straight edge of the blade.
Step 6 – Job done
Nice work, you have now successfully manually sharpened your serrated knife. Ensure to take care of your knives regularly enough so that they do not become dull.
Method 2: Sharpening a serrated knife using a Spyderco Sharpmaker
We here at Sharpen-up highly recommend the assisted manual approach of using the Spyderco Sharpmaker.
It is possible to achieve a razor finish to both straight edge and serrated edge knives with the Spyderco, and it is very easy to use.
Basically, the tool uses a set of ceramic stone rods that are placed into a base in a V angle that measures 40 degrees. All you have to do is keep the knife straight as you move it up and down the rod to sharpen it.
This removes the major hurdle of selecting the correct angle from manual knife sharpening.


评论
发表评论